Playing around with FFmpeg & Automator
I recently got to play around with FFmpeg and the Mac Automator. It was a fun little project to work on, and I learned some things that I thought I’d share. It was also one of those times where I got to apply my knowledge and Google-foo to a real-world problem, and make life just a little bit easier for myself and those around me, which was very rewarding.
Background
My SO likes to record her remote university lectures. The university does not provide these recordings for some reason, my guess is that it would involve an extra step for the teaching staff which would ultimately only lead to reduced attendance. Or there’s another completely valid reason, I’m not sure. In any case, if the students want recordings, they’ll have to set it up themselves.
The lectures are done over a video conferencing tool that doesn’t provide an easy way to record the stream directly, so the natural quick solution was to just record the entire screen using the Mac Screenshot tool. This worked out just fine for a couple of lectures, but…
The Problem
The screen recordings from Screenshot (or whatever it’s called) are HUGE. These high-resolution, high-framerate screen recordings look beautiful, and they have many use-cases. But showing 4 hours of mostly static PowerPoint slides with a tiny low-res image of a talking head in the corner isn’t one of them.
Needless to say, at 8GB per recorded lecture it didn’t take long until the Macbook Pro ran out of disk space.
MacOS does have a built-in solution for encoding videos. It’s right there in the right-click context menu:
However even when encoding with lower resolution, the files were still way too big, and they kept their high frame rate.
FFmpeg to the rescue
I’m not going to go into the details and history of FFmpeg, partly because I don’t know much about it myself. But in short; it is an open source program that lets us process audio and video. For instance, to turn a video_in file into video_out file you might run something like this:
ffmpeg -i video_in video_out
After reading some of the documentation and searching the internet, I found a cuple of command-line options that would turn one of my screen recording files into a much smaller one:
ffmpeg -i Screen\ Recording\ 2020-12-02\ at\ 10.00.00.mov -r 10 -s 1280x720 Screen\ Recording\ 2020-12-02\ at\ 10.00.00.mp4
This turns the original 60fps ~4K video into a ~10fps 720p one (because -r 10 -s 1280x720). To demonstrate, here is a 10 second video recording of a Wikipedia page (4.1MB):
…and here the same video after encoding (160KB):
That’s a significant difference in size (1/25, or 25 times smaller?), with acceptable quality loss. Nice!
That UX, though…
Okay, so I managed to turn big files into small files. Mission Accomplished, right? Wrong.
I’m pretty comfortable with typing commands in a terminal, but doing repetative things like typing the same command with the same options over and over gets old quick. With a user experience this bad, most people would rather just leave the huge files as they were and buy a bigger hard drive.
This called for some automation. I discovered the Automator tool, which looked like it could be useful here. Side note: I also discovered that Automator has been around since 2005 so I’m kind ashamed of not knowing about it before. Anyway, for those that are unaware, the Automator is this graphical programming thingy that lets you add stuff like when X happens, do Y, or when file X is of type Y, add an action to do Z.
There are endless ways I could have done this, but after some fiddling with different kinds of workflows, triggers, actions and shenanigans I ended up with this:
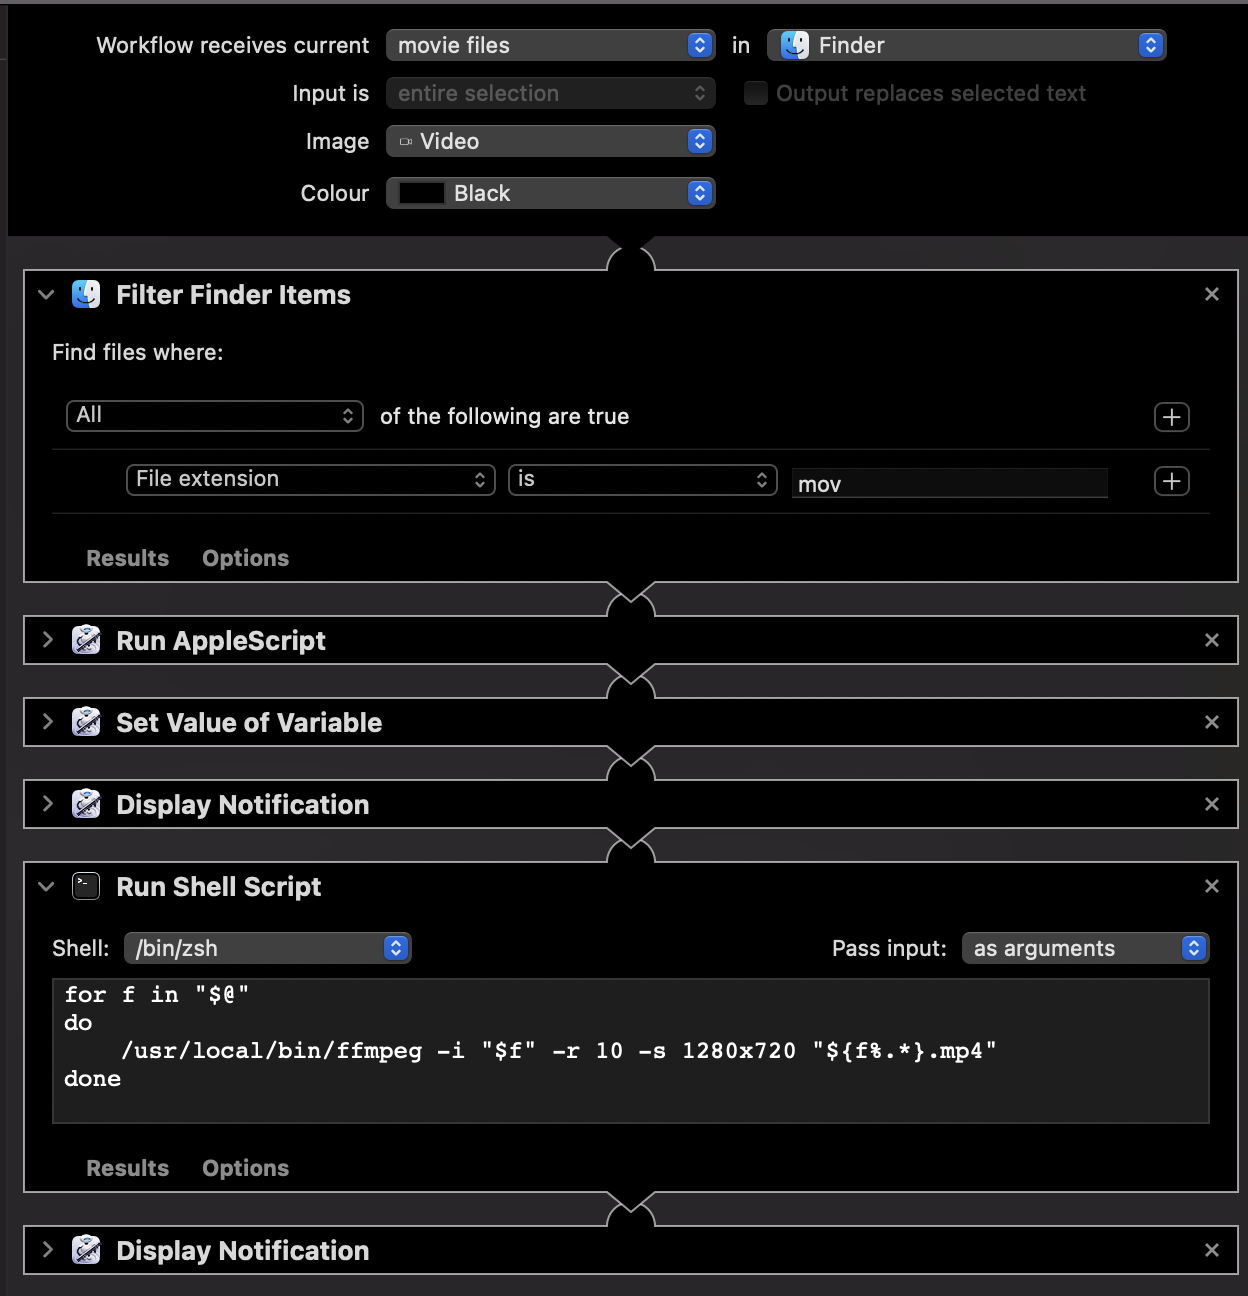
Basically what it does is:
- When the workflow receives .mov files from Finder
- Extract the names of the files, and notify that encoding is starting
- Run ffmpeg with each of the files (same command as above, with some variables for the file names):
for f in "$@" do /usr/local/bin/ffmpeg -i "$f" -r 10 -s 1280x720 "${f%.*}.mp4" done - Notify that encoding is complete
I added the automation as a Quick Action in Finder and…
The Result
Voilà! Now we can encode multiple files at once with just two clicks. Neat, right?
After making some modifications to the script like removing the original files after encoding is done (&& rm "$f"), this became a really useful tool. My SO uses it all the time, and I use it occasionally as well. The Macbook no longer runs out of disk space, even after weeks and months of lectures.
All in all it was a fun and successful project, and I was happy to learn a bit more about FFmpeg and discovering Automator.
Oh, and writing about it was kind of fun as well. A second blog post, who would have thought?